해당 글은 [React] 서버리스 메모앱-3와 이어집니다.
이번 글에서는 React Custome Hook, 회원가입 구성, 메모관련 구성에 대해서 작성을 하였습니다.
백엔드 배포
시작하기전에 앞서 이제 본격적으로 API를 사용해야하므로 프로젝트 루트에서 터미널 명령어로 API를 배포해주고 시작하자
npx sst deploy --stage stageReact Custom Hook
우리는 회원가입에서 로그인 페이지에서 사용하는 필드와 비슷한 기능을 필요로 한다. 따라서 이 프로세스를 단순화하고 필드 구성요소를 공유하여 사용하기 위해 공통화를 진행해보자.
Custom React Hooks의 대표적인 특징으로 컴포넌트 간에 상태 로직을 재사용하는 방법을 제공한다.
src/lib/hooksLib.tsx 파일을 생성하고 아래처럼 코드를 구성하자.
import { useState } from "react";

export interface ISignupField {
  email: string
  password: string
  confirmPassword?: string
  confirmationCode?: string
}

export type UserSingupFields = [ISignupField, (e: any) => void];

export function useFormFields(initialState: ISignupField): UserSingupFields {
  const [fields, setValues] = useState<ISignupField>(initialState);

  return [
    fields,
    (event: any) => {
      setValues({
        ...fields,
        [event.target.id]: event.target.value
      });
    }
  ];
}
Custom Hook 사용
src/containers/Login.tsx 파일에서 구성해놓은 Custom Hook을 사용하여 아래처럼 수정해주자.
import { useFormFields } from "../lib/hooksLib";

export default function Login() {
  // useFormFields로 교체
  const [fields, handleFieldChange] = useFormFields({
    email: "",
    password: ""
  })

  function validateForm() {
    // fields.email, fields.password 로 교체
    return fields.email.length > 0 && fields.password.length > 0;
  }

  async function handleSubmit(event: any) {
    event.preventDefault();

    setIsLoading(true);

    try {
      // fields.email, fields.password 로 교체
      await Auth.signIn(fields.email, fields.password);
      userHasAuthenticated(true);
      history.push("/");
    } catch (e: unknown) {
      onError(e);
      setIsLoading(false);
    }
  }

  return (
    <div className="Login">
      <Form onSubmit={handleSubmit}>
        <Form.Group controlId="email">
          <Form.Label>이메일</Form.Label>
          <Form.Control
            autoFocus
            type="email"
            value={fields.email} // fields.email 교체
            onChange={handleFieldChange} // handleFieldChange 교체
          />
        </Form.Group>
        <Form.Group controlId="password">
          <Form.Label>비밀번호</Form.Label>
          <Form.Control
            type="password"
            value={fields.password} // fields.password 교체
            onChange={handleFieldChange} // handleFieldChange 교체
          />
        </Form.Group>
        <LoaderButton
          block
          size="lg"
          type="submit"
          isLoading={isLoading}
          disabled={!validateForm()}
          className={""}
          >
          로그인
        </LoaderButton>
      </Form>
    </div>
  );
}
회원가입 페이지 구성
이전에 구성한 백엔드와 연결하여 AWS Cognito 를 사용하여 이메일에 확인 코드를 전송하고 또한 새 사용자가 이 코드를 확인하여 인증하도록 회원가입을 구성해보자.
가입 흐름은 다음과 같다.
- 사용자는 이메일, 비밀번호, 비밀번호 확인을 입력
- AWS Amplify 라이브러리를 사용하여 Amazon Cognito에 등록하고 사용자 객체 정보를 응답받음
- AWS Cognito에서 이메일로 보낸 확인 코드를 입력하는 페이지 렌더링
- AWS Cognito에 확인 코드를 전송하여 가입을 확인
- 확인된 코드를 입력하여 가입 완료
- 세션으로 앱 상태 업데이트
회원가입 컨테이너 추가
src/containers/Signup.tsx 파일을 추가하여 아래처럼 코드를 구성하자.
import React, { useState } from "react";
import Form from "react-bootstrap/Form";
import { useHistory } from "react-router-dom";
import LoaderButton from "../components/LoaderButton";
import { Authentication, useAppContext } from "../lib/contextLib";
import { useFormFields } from "../lib/hooksLib";
import { onError } from "../lib/errorLib";
import "./Signup.css";
export default function Signup() {
const [fields, handleFieldChange] = useFormFields({
email: "",
password: "",
confirmPassword: "",
confirmationCode: "",
});
const history = useHistory();
const [newUser, setNewUser] = useState<string | null>(null);
const { userHasAuthenticated } = useAppContext() as Authentication;
const [isLoading, setIsLoading] = useState(false);
function validateForm() {
return (
fields.email.length > 0 &&
fields.password.length > 0 &&
fields.password === fields.confirmPassword
);
}
function validateConfirmationForm() {
return fields.confirmationCode!.length > 0;
}
async function handleSubmit(event: React.MouseEvent<HTMLFormElement>) {
event.preventDefault();
setIsLoading(true);
setNewUser("test");
setIsLoading(false);
}
async function handleConfirmationSubmit(event: React.MouseEvent<HTMLFormElement>) {
event.preventDefault();
setIsLoading(true);
}
function renderConfirmationForm() {
return (
<Form onSubmit={handleConfirmationSubmit}>
<Form.Group controlId="confirmationCode">
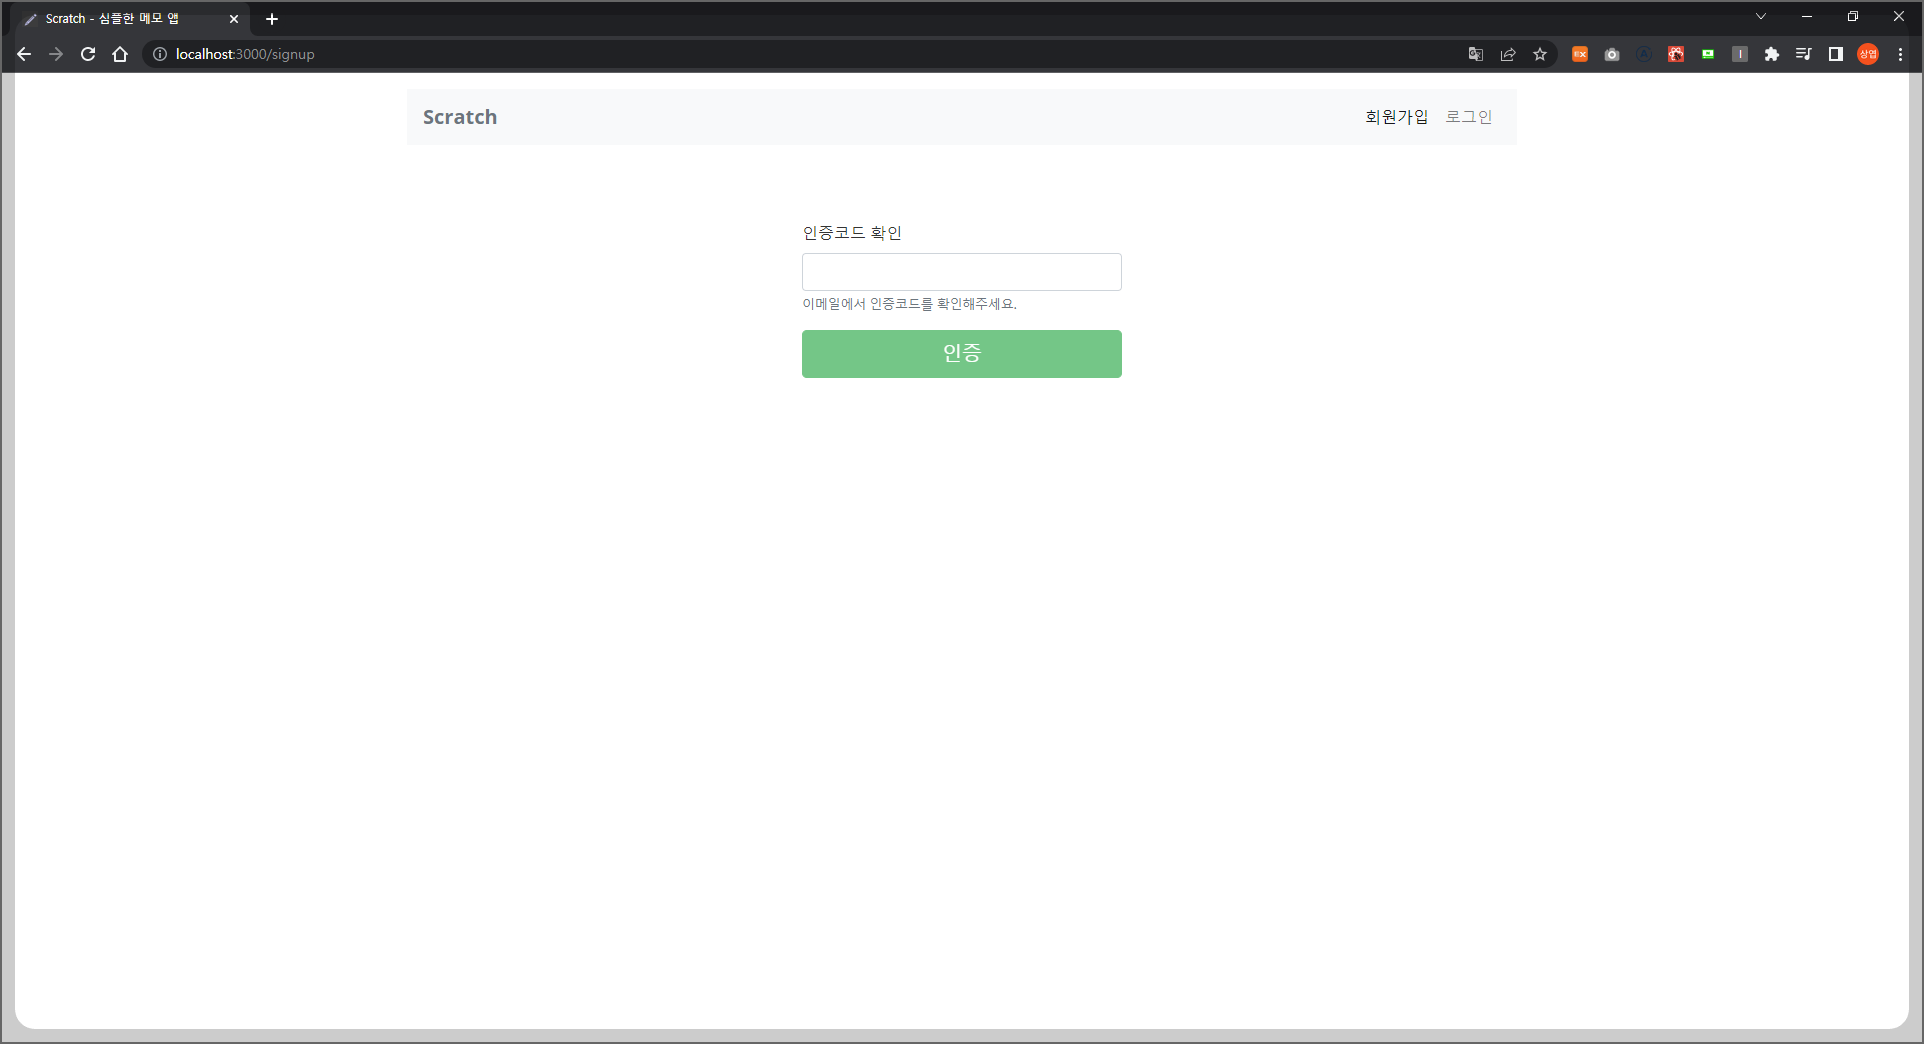
<Form.Label>인증코드 확인</Form.Label>
<Form.Control
autoFocus
type="tel"
onChange={handleFieldChange}
value={fields.confirmationCode}
/>
<Form.Text muted>이메일에서 인증코드를 확인해주세요.</Form.Text>
</Form.Group>
<LoaderButton
block
size="lg"
type="submit"
variant="success"
isLoading={isLoading}
disabled={!validateConfirmationForm()}
className={""}
>
인증
</LoaderButton>
</Form>
);
}
function renderForm() {
return (
<Form onSubmit={handleSubmit}>
<Form.Group controlId="email">
<Form.Label>이메일</Form.Label>
<Form.Control
autoFocus
type="email"
value={fields.email}
onChange={handleFieldChange}
/>
</Form.Group>
<Form.Group controlId="password">
<Form.Label>비밀번호</Form.Label>
<Form.Control
type="password"
value={fields.password}
onChange={handleFieldChange}
/>
</Form.Group>
<Form.Group controlId="confirmPassword">
<Form.Label>비밀번호 확인</Form.Label>
<Form.Control
type="password"
onChange={handleFieldChange}
value={fields.confirmPassword}
/>
</Form.Group>
<LoaderButton
block
size="lg"
type="submit"
variant="success"
isLoading={isLoading}
disabled={!validateForm()}
className={""}
>
회원가입
</LoaderButton>
</Form>
);
}
return (
<div className="Signup">
{newUser === null ? renderForm() : renderConfirmationForm()}
</div>
);
}회원가입 페이지에서 사용자의 newUser 상태값에 따라 다른 컴포넌트를 보여준다.
src/containers/Signup.css 파일을 추가하여 스타일 코드를 구성하자.
@media all and (min-width: 480px) {
  .Signup {
    padding: 60px 0;
  }

  .Signup form {
    margin: 0 auto;
    max-width: 320px;
  }
}
경로 추가
src/Routes.tsx 파일에서 로그인 경로 아래에 회원가입 경로를 추가해주자.
import Signup from "./containers/Signup"; // 상단에 추가

export default function Routes() {
  return (
    <Switch>
        <Route exact path="/">
            <Home />
        </Route>
        <Route exact path="/login">
            <Login />
        </Route>
        <Route exact path="/signup">
            <Signup />
        </Route>
        <Route>
            <NotFound />
        </Route>
    </Switch>
  );
}
}
이제 브라우저에서 실제로 회원가입을 진행하면 아래처럼 보여야한다.
AWS Cognito 연결
AWS Congito 서비스와 연결하기 위해 handleSubmit(), handleConfirmationSubmit() 함수에서 구현을 해보자.
src/containers/Signup.tsx 파일에서 코드를 아래처럼 수정해주자.
import { Auth } from "aws-amplify"; // 상단에 추가
import { ISignUpResult } from 'amazon-cognito-identity-js'; // 상단에 추가

// 타입 변경
const [newUser, setNewUser] = useState<ISignUpResult | null>(null);


async function handleSubmit(event: React.MouseEvent<HTMLFormElement>) {
  event.preventDefault();

  setIsLoading(true);

  try {
    const newUser = await Auth.signUp({
      username: fields.email,
      password: fields.password,
    });
    setIsLoading(false);
    setNewUser(newUser);
  } catch (e) {
    onError(e);
    setIsLoading(false);
  }
}

async function handleConfirmationSubmit(event: React.MouseEvent<HTMLFormElement>) {
  event.preventDefault();

  setIsLoading(true);

  try {
    await Auth.confirmSignUp(fields.email, fields.confirmationCode);
    await Auth.signIn(fields.email, fields.password);

    userHasAuthenticated(true);
    history.push("/");
  } catch (e) {
    onError(e);
    setIsLoading(false);
  }
}
이제 브라우저에서 실제 회원가입을 진행하면 이메일로 인증코드를 확인후에 가입이 가능하다.
Q. 사용자가 인증코드를 입력하지 않고 페이지를 종료하면?
사용자가 회원가입 요청 후 인증코드를 입력하지 않은 상태에서 페이지를 종료하면 기존 메일은 인증코드를 다시 입력할 수 없으며 새로운 메일로 가입해야하는 문제점이 있다. 이런 예외사항을 처리할 수 있을지한번 고민해보고 해결해보면 어떨까?
필자는 두가지 정도 해결방안을 생각해보았다.
- 에러코드 확인 후 인증코드 확인 페이지로 이동하기
- Auth.resendSignUp() 메서드로 다시 인증코드 보내기
한번 위에 내용을 참고하여 직접 해결해보도록 하자 (나중에 예시코드를 공개할 예정이다.)
메모 생성 페이지 추가
이제 회원가입 및 로그인이 가능해졌다. 본격적으로 메모를 생성하는 페이지를 구성해보자.
src/containers/NewNote.tsx 파일을 추가하고 아래처럼 코드를 구성하자.
import React, { useRef, useState } from "react";
import Form from "react-bootstrap/Form";
import { useHistory } from "react-router-dom";
import LoaderButton from "../components/LoaderButton";
import { onError } from "../lib/errorLib";
import config from "../config";
import "./NewNote.css";

export default function NewNote() {
  const file = useRef<any>(null);
  const history = useHistory();
  const [content, setContent] = useState("");
  const [isLoading, setIsLoading] = useState(false);

  function validateForm() {
    return content.length > 0;
  }

  function handleFileChange(event: any) {
    file.current = event.target.files[0];
  }

  async function handleSubmit(event: any) {
    event.preventDefault();

    if (file.current && file.current.size > config.MAX_ATTACHMENT_SIZE) {
      alert(
        `${config.MAX_ATTACHMENT_SIZE /
          1000000} MB 이하의 파일로 첨부해주세요.`
      );
      return;
    }

    setIsLoading(true);
  }

  return (
    <div className="NewNote">
      <Form onSubmit={handleSubmit}>
        <Form.Group controlId="content">
          <Form.Control
            value={content}
            as="textarea"
            onChange={(e) => setContent(e.target.value)}
          />
        </Form.Group>
        <Form.Group controlId="file">
          <Form.Label>첨부파일</Form.Label>
          <Form.Control onChange={handleFileChange} type="file" />
        </Form.Group>
        <LoaderButton
            block
            type="submit"
            size="lg"
            variant="primary"
            isLoading={isLoading}
            disabled={!validateForm()}
            className={""}        >
          만들기
        </LoaderButton>
      </Form>
    </div>
  );
}
위에 코드에서 파일 입력의 경우 브라우저가 파일의 상태를 처리하기 위해서 useState Hooks 대신 useRef Hooks를 사용한다 이 둘의 주요 차이점은 useRef Hooks는 구성 요소를 다시 렌더링하지 않는다는 특징이 있다.
src/config.ts 파일에서 아래처럼 설정값을 추가해주자.
const config = {
  MAX_ATTACHMENT_SIZE: 5000000, // 추가
  // Backend config
  s3: {
    REGION: process.env.REACT_APP_REGION,
    BUCKET: process.env.REACT_APP_BUCKET,
  },
  apiGateway: {
    REGION: process.env.REACT_APP_REGION,
    URL: process.env.REACT_APP_API_URL,
  },
  cognito: {
    REGION: process.env.REACT_APP_REGION,
    USER_POOL_ID: process.env.REACT_APP_USER_POOL_ID,
    APP_CLIENT_ID: process.env.REACT_APP_USER_POOL_CLIENT_ID,
    IDENTITY_POOL_ID: process.env.REACT_APP_IDENTITY_POOL_ID,
  },

};

export default config;
src/containers/NewNote.css 파일을 추가하여 스타일을 구성해주자.
.NewNote form textarea {
  height: 300px;
  font-size: 1.5rem;
}
마지막으로 src/Routes.tsx 파일에서 경로를 추가해주자.
import React from "react";
import { Route, Switch } from "react-router-dom";
import Home from "./containers/Home";
import Login from "./containers/Login";
import Signup from "./containers/Signup";
import NewNote from "./containers/NewNote"; // 추가
import NotFound from "./containers/NotFound";

export default function Routes() {
  return (
    <Switch>
        <Route exact path="/">
            <Home />
        </Route>
        <Route exact path="/login">
            <Login />
        </Route>
        <Route exact path="/signup">
            <Signup />
        </Route>
        <Route exact path="/notes/new"> // 추가
            <NewNote />
        </Route>
        <Route>
            <NotFound />
        </Route>
    </Switch>
  );
}
브라우저에서 http://localhost:3000/notes/new 주소를 입력하여 확인해보자
Call the Create API
이제 기본 메모 내용을 저장하기위해 API와 연결을 진행해보자.
src/containers/NewNote.tsx 파일에서 아래처럼 코드를 수정해주자.
  import { API } from "aws-amplify"; // 상단에 추가

  async function handleSubmit(event: any) {
    event.preventDefault();

    if (file.current && file.current.size > config.MAX_ATTACHMENT_SIZE) {
      alert(
        `${config.MAX_ATTACHMENT_SIZE /
          1000000} MB 이하의 파일로 첨부해주세요.`
      );
      return;
    }

    setIsLoading(true);

	// 코드 추가
    try {
        await createNote({ content });
        history.push("/");
      } catch (e) {
        onError(e);
        setIsLoading(false);
    }
  }

  // 함수 추가
  function createNote(note: any) {
    return API.post("notes", "/notes", {
      body: note
    });
  }
S3에 업로드
아직 파일 업로드는 구성하지 않았으므로 src/lib/awsLib.tsx 파일을 생성하고 아래처럼 코드를 구성하자.
import { Storage } from "aws-amplify";

export async function s3Upload(file: any) {
  const filename = `${Date.now()}-${file.name}`;

  const stored = await Storage.vault.put(filename, file, {
    contentType: file.type,
  });

  return stored.key;
}
src/containers/NewNote.tsx 파일에서 handleSubmit() 함수를 아래처럼 수정해주자.
import { s3Upload } from "../lib/awsLib"; // 상단에 추가

async function handleSubmit(event: any) {
    event.preventDefault();

    if (file.current && file.current.size > config.MAX_ATTACHMENT_SIZE) {
      alert(
      `${config.MAX_ATTACHMENT_SIZE /
          1000000} MB 이하의 파일로 첨부해주세요.`
      );
      return;
    }

    setIsLoading(true);

    try {
        const attachment = file.current ? await s3Upload(file.current) : null;

        await createNote({ content, attachment });
        history.push("/");
    } catch (e) {
        onError(e);
        setIsLoading(false);
    }
  }
List Memo
이제 새로운 메모를 저장할 수 있으니 <Home /> 컴포넌트에서 모든 메모를 볼 수 있도록 구성해보자.
src/containers/Home.tsx 파일에서 아래처럼 코드를 수정하자.
import React, { useState, useEffect } from "react";
import ListGroup from "react-bootstrap/ListGroup";
import { useAppContext, Authentication } from "../lib/contextLib";
import { onError } from "../lib/errorLib";
import { API } from "aws-amplify";
import { BsPencilSquare } from "react-icons/bs";
import { LinkContainer } from "react-router-bootstrap";
import "./Home.css";
interface INotes {
noteId: string
content: string
createdAt: string
}
export default function Home() {
const [notes, setNotes] = useState([]);
const { isAuthenticated } = useAppContext() as Authentication;
const [isLoading, setIsLoading] = useState(true);
useEffect(() => {
async function onLoad() {
if (!isAuthenticated) {
return;
}
try {
const notes = await loadNotes();
setNotes(notes);
} catch (e) {
onError(e);
}
setIsLoading(false);
}
onLoad();
}, [isAuthenticated]);
function loadNotes() {
return API.get("notes", "/notes", {});
}
function renderNotesList(notes: INotes[]) {
return (
<>
<LinkContainer to="/notes/new">
<ListGroup.Item action className="py-3 text-nowrap text-truncate">
<BsPencilSquare size={17} />
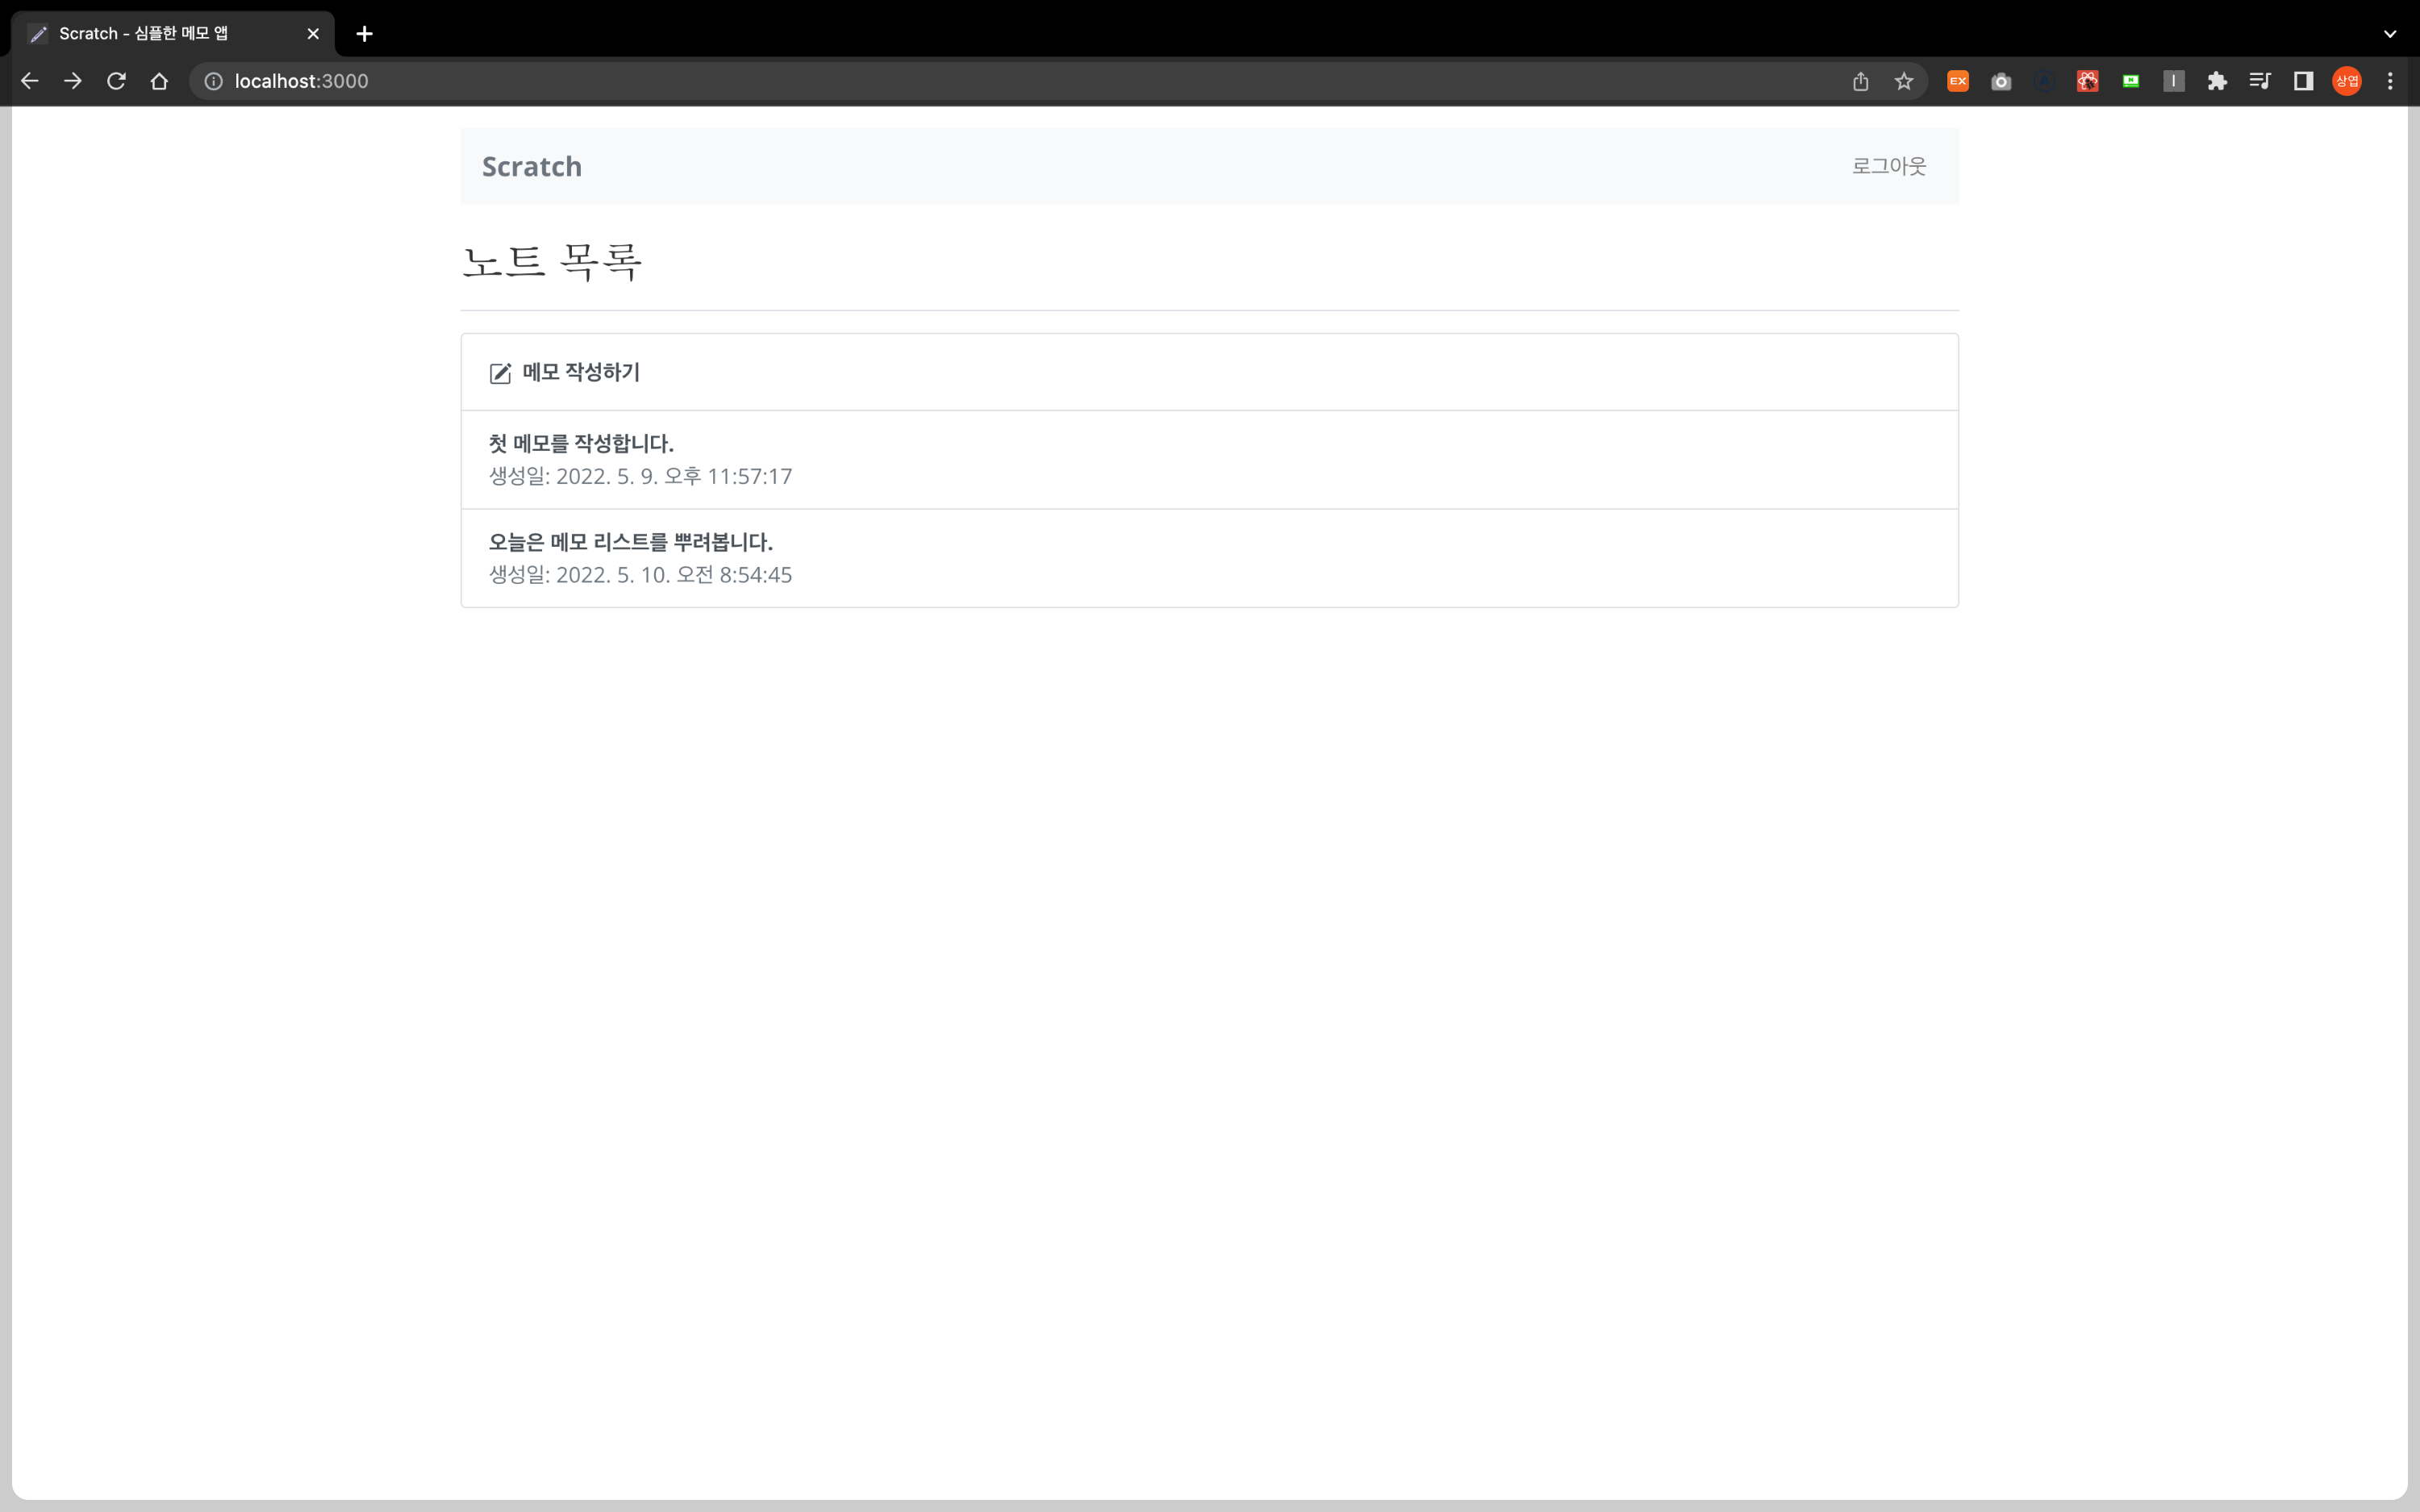
<span className="ml-2 font-weight-bold">메모 작성하기</span>
</ListGroup.Item>
</LinkContainer>
{notes.map(({ noteId, content, createdAt }) => (
<LinkContainer key={noteId} to={`/notes/${noteId}`}>
<ListGroup.Item action>
<span className="font-weight-bold">
{content.trim().split("\n")[0]}
</span>
<br />
<span className="text-muted">
생성일: {new Date(createdAt).toLocaleString()}
</span>
</ListGroup.Item>
</LinkContainer>
))}
</>
);
}
function renderLander() {
return (
<div className="lander">
<h1>Scratch</h1>
<p className="text-muted">심플한 메모 앱</p>
</div>
);
}
function renderNotes() {
return (
<div className="notes">
<h2 className="pb-3 mt-4 mb-3 border-bottom">노트 목록</h2>
<ListGroup>{!isLoading && renderNotesList(notes)}</ListGroup>
</div>
);
}
return (
<div className="Home">
{isAuthenticated ? renderNotes() : renderLander()}
</div>
);
}메모를 만들면 아래처럼 홈 영역에서 메모가 나타나야 한다.
이제 마지막으로 Github에 작성한 소스를 올려주자
[React] 서버리스 메모앱-4
- React Custom Hook
- 회원가입
- 메모 생성하기
- 메모 리스트 조회
이번 문서에서는 위와 같이 회원가입 및 메모 생성 & 리스트 조회를 구성하였습니다.
다음 파트가 서버리스 메모앱의 마지막 파트이며 메모 상세조회, 수정, 삭제, 보안 페이지, 배포에 대해 다루게 되며 [React] 서버리스 메모앱-5 파트에서 정리하도록 하겠습니다.
'IT > React' 카테고리의 다른 글
| [React] 서버리스 메모앱-5 (0) | 2022.05.10 |
|---|---|
| [React] 서버리스 메모앱-3 (0) | 2022.04.24 |
| [React] 서버리스 메모앱-2 (3) | 2022.04.18 |
| [React] 서버리스 메모앱-1 (1) | 2022.04.17 |


